Author Archives: Rudolf - Page 5

A little (versioning) pain with Powershell

First thing to mention is I’m not complaining about PowerShell itself or functionality provided with PowerShell. Rather, this is a problem with referencing it from .Net (C#) and versioning when used on another machine where the .Net App was deployed and happen to have an older version of PowerShell (PS for short).

Scenario

If you want to run PowerShell scripts from a C# program like I’m doing in QuickMon now, you have to add a reference to “System.Management.Automation.dll“. I happen to have Version 4.0 of PowerShell on the computer where the C# app is compiled. Now, this is all fun and games until you want to run the same app on another machine that only have, say Version 2.0 of PowerShell. PS 2 does have a version of System.Management.Automation.dll but somehow it is not compatible (at run time). When I compiled the same app on a computer that only has V2.0 of PowerShell and deploy that app to machines that has either PS v2.0 or v4.0 it works on all of them.

If this was C++ it would have made sense (dll versioning very strict) but this is a C# app that supposively should not care about the version of the referenced assembly (and yes, this is a .Net assembly). The methods (I) used in the dll are all the same of both versions.

I even tried generating the System.Management.Automation.dll file manually on the ‘target’ machine and copy that dll to the App’s directory (using the PS “Copy ([PSObject].Assembly.Location) C:\” command) but this gave other versioning referencing errors.

Possible solution

The solution that seems to work for now is to set the ‘Specific Version‘ property on the referenced dll in the C# project to true (making sure it points to the PS 2.0 related version – dll version 6.1.7601.17514). Interestingly enough when switching the project to ‘release’ configuration it display pointing to ‘C:\Windows\assembly\GAC_MSIL\System.Management.Automation\1.0.0.0__31bf3856ad364e35\System.Management.Automation.dll’. That tells me the PS version ‘2.0’ of that assembly is still available (on my PS 4.0 computer). As a safety precaution I also set the ‘Copy Local’ property on this referenced dll to True to have it deployed with the app.

Deploying this combination seems to work on all ‘target’ machines – I even saw it working on a computer that only has PS 1.0!

All fun and joy… as long as there’s no lawyer sitting on a loo in the bush… with an angry T-Rex nearby…

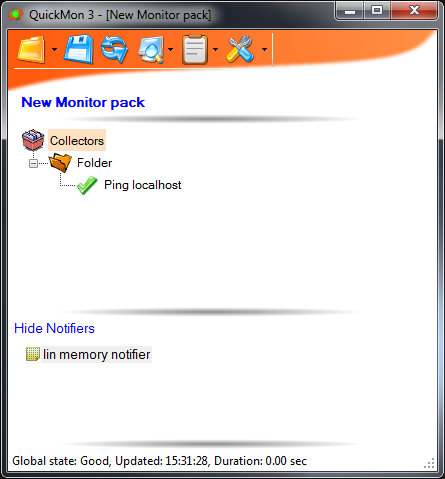
QuickMon 3.7

It has been a while since I mentioned any updates of my QuickMon monitoring tool. It has now reached version 3.7 with many new and improved features. There are so many that I can’t remember all of them now but here are some highlights:

  • Context menu for Collectors (and Notifiers) improved
  • View statistics of collector polls
  • Copy and Paste of Collectors or whole branches in the tree view
  • General UI has been simplified (several times)
  • Remote Agents (query resources via another machine)
  • An OleDb query collector has been added (with limitations)
  • Restoration scripts (opposite or corrective scripts)
  • Alert suppression based on # of polls
  • Ability to register the Service (and remote host) plus add firewall exception rule from application itself
  • Some minor fixes to existing collectors

QuickMon3.7

Get it from CodePlex here.

How to install Access 64-bit driver with Office 32-bit on same machine

Firstly I’ll be frank and say this whole issue stink – just another nice Microsoft bugger-up. By default you cannot install the x64 driver for Access (AccessDatabaseEngine_x64.exe) on a machine that already has a standard 32-bit version of Office (which should be for the majority of users). However, if you run any 64-bit apps they won’t be able to access any ODBC/OLEDB drivers like for Access or CSV and so on. Yes, you can explicitly run the app as a 32-bit app and then access those 32-bit drivers again but then any 64-bit functionality goes out the door. (aka in .Net you can set the target platform to x86 and then it should work).

Now, there is a way to install AccessDatabaseEngine_x64.exe on a machine that has 32-bit Office (2010 I tested with) without the installer freaking out and gives you the error that it cannot continue because a 32-bit version of office is installed. To do it run this:

AccessDatabaseEngine_x64.exe /passive

That will give you the ability to open the 64-bit ODBC data Sources app and add DSNs. Wonderful except for one MAJOR big problem. If you now open up any office application if will freak out – something about some odbcij.dll missing or something. You can try a repair install but that will break the 64-bit ODBC/OLEDB drivers again. Bugger!

Fortunately there is a way around that problem as well. This will work if you don’t have Access installed (I have not tried it with Access installed and it might break Access altogether).

Open regedit and go to “HKEY_LOCAL_MACHINE\SOFTWARE\Microsoft\Office\14.0\Common\FilesPaths“. If there is a key to mso.dll delete it (at your own risk of course).

Now you should be able to open Office without it complaining and the 64-bit ODBC driver tool will also work. If for some reason you did an Office repair and it broke the AccessDatabaseEngine_x64.exe install you must first uninstall it from control panel (something like Microsoft Access database engine 2010) and then rerun the AccessDatabaseEngine_x64.exe /passive command.

Lets hope Microsoft will find a better way to fix their own mess.

Update: BTW in Windows 7 64-bit (probably Vista as well) you can create a shortcut to the 64-bit ODBC control panel tool using this link: C:\WINDOWS\SysWOW64\odbcad32.exe. In Windows 8 at least they have separate entries (well I’m using classic shell…).

Update2: To use the 64-bit OLEDB provider for Access use the provider string “Microsoft.ACE.OLEDB.12.0“. Using the old string “Microsoft.Jet.OLEDB.4.0” does not work anymore (on 64-bit)

Update3: It seems newer versions of Office does some kind of check/repair after reboots and so returning the mso.dll registry value and breaking 32-bit Office applications again. To fix this use a registry file like this:

Windows Registry Editor Version 5.00

[HKEY_LOCAL_MACHINE\SOFTWARE\Microsoft\Office\14.0\Common\FilesPaths]
“mso.dll”=-

Possibly you can put it in a batch file that runs during startup (or scheduled task with Admin permissions)

Deleting a folder with path that is too long

Just a quick tip I came across today after having a problem where I found a directory where some tool went nuts and kept on creating subdirectories recursively. Trying to delete this directory will give you an error – something like ‘Path is too long…’

Lets say the path is something like d:\directory1\directory1\directory1\directory1…..\directory1

Windows Explorer and even Command prompt won’t allow you to delete d:\dir1 (No not even right-click delete will work).

A simple solution is to recursively go and rename all the directories to something much shorter so the overall length is less that the maximum (260 characters).

Like this: rename d:\directory1 0  , rename d:\0\directory1 0 etc.

The end result should be like this: d:\0\0\0\0… \0

Now you can simply delete it in Windows Explorer without any ‘Path Too long’ errors.

QuickMon 3

QuickMon 3 has been released (3.1 is already out)

Hope you like it and please give feedback. To see some screen shots look at this.

How to get the full update for VS2013

This tip applies to all editions and even previous versions (2012, 2012) of Visual Studio.

Since Microsoft has been releasing these updates e.g. VS2013.1 etc) the default behavior for these installers are to just download what is need at the time they are run. This is all good and well if you have only one machine that needs updating. What happens if you have to update a whole bunch of installs?

Luckily the VS2013.x installers support an undocumented (or not well) command line parameter ‘/layout’ that allows you to have the full update downloaded to a local folder. From there you can run the same installer without the parameter and it won’t download any additional stuff again.

Full command: VS2013.1.exe /layout

Happy downloading… only once.

QuickMon 3 Beta

A quick heads-up. I’ve released a Beta version of QuickMon3 on CodePlex. I’ll post a more detail listing of all the features once the final version is relased but here is a quick summary:

1. Introduction of ‘Remote agents’, aka The Windows service acts as a remote host so collectors can be run as if they run on the host machine (where the service runs). It makes use of WCF.
2. Consolidation of existing Ping collectors (ICMP, HTTP and sockets)
3. Simplification of UI (as far as possible)
4. ‘Editing’ configuration can be done straight from the main UI (no separate editing window)
5. ‘Service windows’ have been changed a bit (simplified I hope)
6. It is not 100% compatible with qmconfig files of version 2.0 (will attempt to upgrade them but then QuickMon 2 won’t be able to use them anymore.
7. It can run side-by-side with QuickMon 2 – provided it is installed into a separate directory (default anyway)

QuickMon 3 use the .Net 4.0 framework and was developed using VS2013 Express for Desktop. It has been tested on Windows 7 (x64), Windows 8, 2003, 2008 so far – but it should work on all versions compatible with .Net 4.0.

Go grab it here.

MainWindow Example

MainWindow Example

ListViewEx – Auto resize selected column

What do you do when you get fed up having to write the same code over and over again? Write a base class for it… of course.

I regularly use the WinForms ListView control and often want to specify a specific column (in detail view) that must auto resize when the whole control resize. Therefore I created the following class that does all that (and more stuff) to make life easier.

public class ListViewEx : ListView
    {
        public ListViewEx()
            : base()
        {
            DoubleBuffered = true;
            View = View.Details;
            resizeTimer.Tick +=  resizeTimer_Tick;
        }

        [Description("Use one column to auto resize in detail view")]
        public bool AutoResizeColumnEnabled { get; set; }
        [Description("Column index of auto resize column")]
        public int AutoResizeColumnIndex { get; set; }
        public event MethodInvoker EnterKeyPressed;
        public event MethodInvoker DeleteKeyPressed;
        protected override void OnKeyPress(KeyPressEventArgs e)
        {
            if (e.KeyChar == '\r')
                if (EnterKeyPressed != null)
                {
                    EnterKeyPressed();
                    e.Handled = true;
                }
            base.OnKeyPress(e);
        }
        protected override void OnKeyDown(KeyEventArgs e)
        {
            if (e.KeyCode == Keys.Delete)
                if (DeleteKeyPressed != null)
                {
                    DeleteKeyPressed();
                    e.Handled = true;
                }
            base.OnKeyDown(e);
        }
        private Timer resizeTimer = new Timer() { Interval = 100, Enabled = false };
        private void resizeTimer_Tick(object sender, EventArgs e)
        {
            resizeTimer.Enabled = false;
            try
            {
                if (AutoResizeColumnEnabled && View == System.Windows.Forms.View.Details &&
                    AutoResizeColumnIndex > -1 && this.Columns.Count > AutoResizeColumnIndex)
                {
                    int columnsWidth = 0;
                    Application.DoEvents();
                    for (int i = 0; i < this.Columns.Count; i++)
                    {
                        if (i != AutoResizeColumnIndex)
                            columnsWidth += this.Columns[i].Width;
                    }
                    this.Columns[AutoResizeColumnIndex].Width = this.ClientSize.Width - columnsWidth - 2;
                }
            }
            catch { }
        }
        protected override void OnResize(EventArgs e)
        {
            resizeTimer.Enabled = false;
            resizeTimer.Enabled = true;
            base.OnResize(e);
        }
    }

Now all you have to do is set the AutoResizeColumnEnabled property to true and specify a column index for AutoResizeColumnIndex and there you go. Easy hey?

Should I handle Exceptions or not?

I’ll start this post with a statement or answer that might seem controversial.

The answer is ‘NO’

Why? Let me explain. If your code has reached a state where an Exception has been thrown it means you have already missed something (possible) important that should have been addressed. Sure, throwing (excuse the pun) a ‘try… catch’ around every block of code is nice and all – and you should do it anyway (for other reasons) but it is no excuse for writing bad code.

More details

One reason I say these things I recently (re)discovered myself… again is that ‘Performance’ in an application can greatly be influenced by exceptions since the whole process of encountering/throwing an exception in code is a slow thing. When you have code that relies on catching an exception in order to handle an (possibly) expected condition of some variables it is a sign that you are doing it wrong… It may not be a big issue if the affected code is called only once in a blue moon but once it is in a section that is called repeatedly and is expected to perform at speed it becomes a huge issue.

Have a look at this code. It will run fine but and actually be usable but…

try
{
   SomeType tp = SomeObject.SomeVar;
}
catch // null reference exception or something expected the first time
{
  SomeObject = new SomeObjectType();
  ...
}

Now look at a better way

if (SomeObject == null)

SomeObject = new SomeObjectType();

SomeType tp = SomeObject.SomeVar;

...

This code will actually run faster and does not rely on an Exception to handle something that should be done right to start with.

Ok, there you have it…

N7 Day

Just though to make my own little contribution to N7 day by posting the group photo of my last ME3 play through. The memories…

GroupphotoSml

Still, I would have liked an ending that was a bit different… just saying…